A washbay is more than just a place to clean vehicles or equipment — it is an environmental control zone. Whether it serves a fleet maintenance depot, a mining operation, a food processing facility, or a construction yard, the drainage system beneath the washbay floor is what keeps operations compliant, safe, and sustainable.
Poor drainage design leads to flooding, contaminated stormwater runoff, regulatory fines, and costly retrofits. Done right, a washbay drainage system efficiently captures wash water, separates contaminants, and routes effluent to appropriate treatment or disposal points.
This step-by-step guide walks you through every critical stage of washbay drainage design — from site assessment and grating selection to sump sizing and water treatment options.
Step 1: Understand the Site and Define the Design Brief
Before drawing a single line, gather the following information:
- Type of washbay: Is it for light vehicles, heavy trucks, mining equipment, or industrial plant?
- Wash volume: How many wash cycles per day? What is the estimated water usage per wash?
- Contaminants expected: Mud, oil, grease, chemicals, heavy metals, or biological matter?
- Local regulations: What do local environmental authorities require for discharge quality?
- Connection points: Is there a sewer connection, a trade waste agreement, or will water be recycled on-site?
This information defines your hydraulic load, your treatment requirements, and your compliance obligations. Never skip this step — it determines every decision that follows.
Step 2: Design the Floor and Channel Layout
Floor Gradient
The washbay floor must be sloped to drain efficiently. A minimum gradient of 1:100 (1%) is recommended, with 1:80 preferred in heavy-duty applications. Floors should drain toward central channels or perimeter drains, never toward doorways or the external environment.
Channel Placement
Drainage channels (linear drains) should be positioned:
- Across the front and rear of the washbay to capture runoff before it exits
- Down the sides or centre of the bay for wide bays with central wash equipment
- At transitions between the wash zone and clean zones
Channels must be continuously sloped along their length at a minimum of 0.5% to prevent sediment accumulation and standing water.
Isolation Bunding
Install concrete bunding (kerbs) at all bay entrances and exits. This prevents uncontrolled runoff from escaping the washbay perimeter and entering stormwater infrastructure. Bunding height of 150–200mm is typical for vehicle washbays.
Step 3: Select the Right Grating
Grating is the visible, trafficable surface of your drainage channel. It must handle load while allowing water and debris to pass through freely.
Load Rating
Grating must be selected to match the traffic class of the washbay:
| Load Class | Application |
| A15 | Pedestrian and light foot traffic only |
| B125 | Light vehicles (cars, small vans) |
| C250 | Medium vehicles (delivery trucks) |
| D400 | Heavy vehicles (semi-trailers, buses) |
| E600 | Airport / heavy industrial equipment |
| F900 | Mining haul trucks, specialty plant |
Always select one class above the expected load to build in a safety margin.
Grating Material
- Galvanised steel: Cost-effective, strong, suitable for most general washbays
- Stainless steel (304 or 316): Corrosion-resistant, ideal for food-grade or chemical washbays
- Ductile iron: High strength for heavy plant, longer lifespan under impact
- FRP (fibreglass): Lightweight, chemical resistant, non-conductive — good for chemical or EV facilities
Grating Slot Width
For washbays dealing with heavy mud or debris, use a wider slot (12–15mm). For facilities focused on fine solids or finer contaminants, a narrower slot (8–10mm) combined with a sump for collection is more appropriate.
Step 4: Size and Position the Sumps
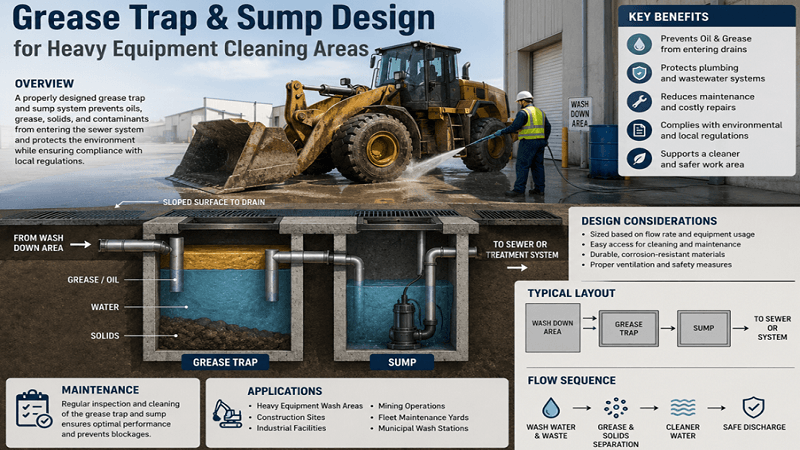
Sumps (also called pits or interceptors) are subsurface collection chambers that receive water from the drainage channels. They serve three purposes: sediment collection, flow regulation, and primary separation.
Sump Types
- Sediment Sump (Mud Pit) The first sump in the drainage chain. It collects gross solids — mud, gravel, sand, and debris — that fall off vehicles. It should be:
- Located at the lowest point of the drainage system
- Sized to hold at least 500–1,000 litres for a standard heavy vehicle bay
- Fitted with a removable basket or hopper for easy cleanout
- Cleaned regularly (weekly to monthly depending on washbay usage)
- Oil/Water Separator (OWS) After gross solids are removed, wash water flows into the oil/water separator. This chamber uses gravity separation to remove free-floating oils, fuels, and greases. Key design parameters include:
- Hydraulic retention time (HRT) of at least 2 minutes
- Inlet baffle to dissipate flow energy
- Outlet baffle to prevent re-entrainment of separated oil
- Oil storage capacity above the water level
- An effluent quality target of <15 mg/L of hydrocarbons (check local standards)
- Collection or Holding Sump In some designs, treated or partially treated water is held in a collection sump before being pumped to sewer, recycled, or further treated. This is particularly useful where peak flows exceed sewer acceptance rates.
Step 5: Plan the Drainage Pipework
Connecting channels, sumps, and treatment systems requires careful pipe design.
- Pipe diameter: A minimum of 100mm for washbay drainage; 150mm or larger for heavy-duty applications
- Pipe gradient: Minimum 1:100 for gravity flow; steeper where possible to prevent solids settling
- Pipe material: uPVC or HDPE for most applications; stainless steel or chemical-resistant pipe where aggressive fluids are present
- Access points: Install inspection ports and cleanout access at every change of direction and at maximum 12-metre intervals along straight runs
- Backflow prevention: Install a check valve where drains connect to sewer to prevent sewage backflow into the washbay
Step 6: Select the Water Treatment System
The level of treatment required depends on your end-use or discharge destination.
Option A: Discharge to Sewer (Trade Waste)
If you hold a trade waste agreement, your water must meet the utility’s acceptance standards — typically:
- pH: 6.0–10.0
- Total suspended solids (TSS): <200 mg/L
- Oil and grease: <50 mg/L (some require <10 mg/L)
In most cases, a well-designed sediment sump + OWS will meet sewer acceptance standards. A pH correction dosing unit may be required if alkaline wash detergents are used.
Option B: Discharge to Stormwater (Where Permitted)
This is rarely permitted without significant treatment. A full treatment train may include:
- Sediment sump
- Coagulation/flocculation dosing
- Dissolved air flotation (DAF) unit
- pH correction
- Polishing filter
Stormwater discharge requires ongoing monitoring and environmental licensing.
Option C: Water Recycling / Reuse
Water recycling is increasingly favoured for sustainability and cost savings. A recycling system typically includes:
- Sediment removal
- Oil/water separation
- Biological or chemical treatment
- Filtration (sand or multimedia)
- UV disinfection or chemical dosing
- Storage tank and pump system for reuse
Recycled water is returned to the wash nozzles, reducing freshwater consumption by 60–80% in well-designed systems.
Step 7: Consider Environmental and Compliance Requirements
No washbay drainage design is complete without addressing the regulatory framework.
- Environmental Protection licences: Required in many jurisdictions for industrial washbays discharging to the environment
- Trade waste permits: Required for connection to municipal sewer — apply before construction
- Spill containment: The bunding system must contain a minimum volume equivalent to the largest potential spill (including firefighting water in some codes)
- Stormwater bypass prevention: Automatic shut-off valves or divert valves must prevent untreated washwater from entering stormwater drains
- Signage and operational controls: Install clear signage indicating drainage zones, chemical storage restrictions, and emergency procedures
Engage your local environmental authority early — approvals can take time and may influence your design significantly.
Step 8: Maintenance Planning
Even the best-designed drainage system fails without a maintenance programme. Build the following into your operations plan:
| Component | Frequency | Task |
| Grating | Weekly | Remove and clean debris |
| Sediment sump | Monthly (or as needed) | Pump out accumulated solids |
| Oil/water separator | Quarterly | Remove accumulated oil; inspect baffles |
| Pipework | Bi-annually | CCTV inspection or flush |
| Treatment system | Per manufacturer schedule | Filter replacement, UV lamp checks |
| Holding sump | Annually | Full cleanout and structural inspection |
Maintenance records should be kept on file to demonstrate compliance during audits.
Conclusion
A well-designed washbay drainage system is an investment in compliance, environmental protection, and operational efficiency. By working through each step — from floor gradients and grating selection, through sump sizing and pipework, to the right water treatment solution for your discharge point — you build a system that works reliably under real operating conditions.
The key principles to remember are: capture everything, separate effectively, treat appropriately, and maintain consistently. Get these right, and your washbay will perform cleanly, safely, and sustainably for decades.